Creating Configurable and Portable SSIS Packages Part 3
In this article I’ll conclude my set of articles into SSIS configuration. This article will be slightly more verbose than the previous two, but I hope I clearly convey the logic behind my method. If you haven’t yet done so, please read Part 1 and Part 2 of the series.
The Portability problem
In my first forays into SSIS I had thought that as part of the deployment process SSIS would allow things me to change things like connection string of the source data and location of extract file. However this is not available by default.
To enable configurability, you have to go to the package properties and enable configuration right at the development stage (and with complex packages I would suggest that the earlier this is done in this phase the better). Right click on the Control Flow and choose Package Configurations.
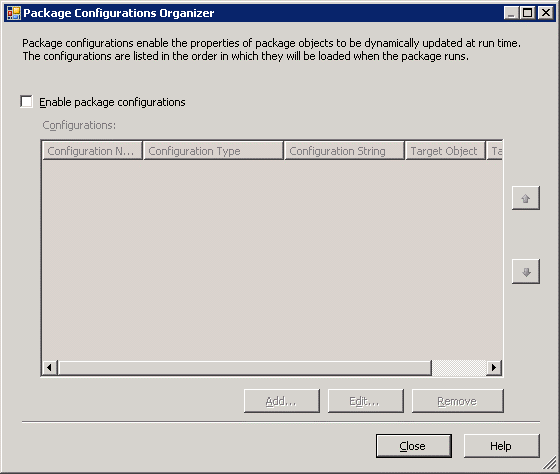
Put a tick in Enable package configurations. Click Add… to kick off the Package Configuration Wizard. My first attempt at this was that it would be nice to have a configuration file which I could amend at any time to shape the behaviour of my package. That was the web developer in me. So I create an XML configuration for my package and carefully selected the parameters that I needed to make configurable. Let’s see how to do this now.
XML Configuration
After you enable configuration, click the Add… button. This starts the Package Configuration Wizard
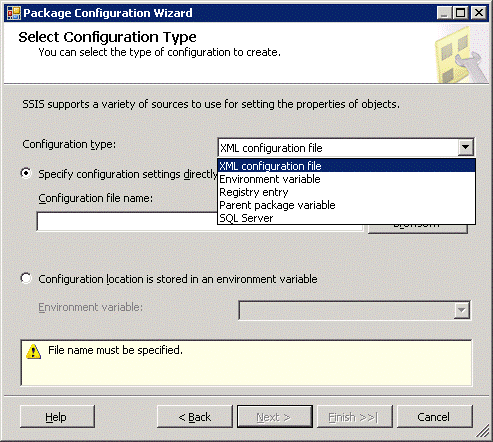
For now, leave the Configuration type as XML configuration file and the option to Specify configuration settings directly, selected. Browse to a suitable location (not in the bin folder of the project) and enter a filename for the configuration file. Click Next.
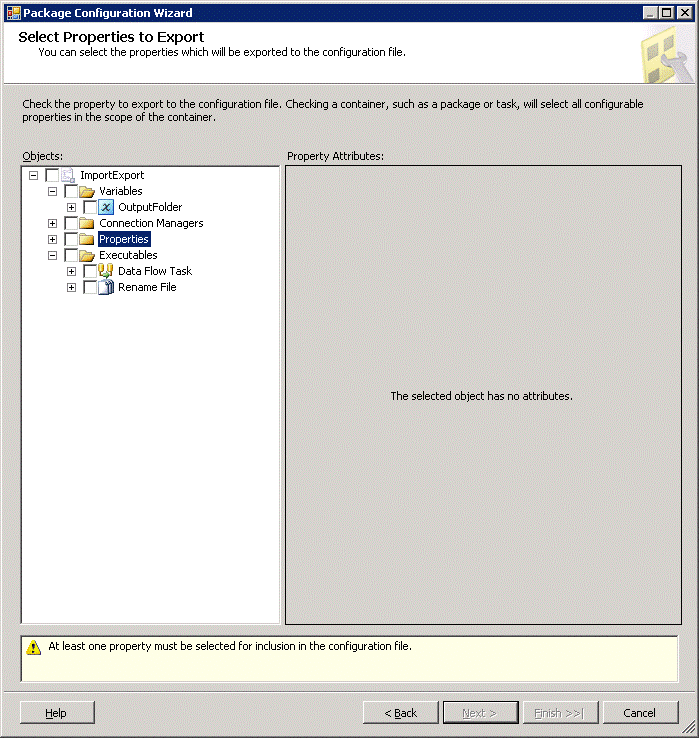
We now have a list of configurable properties (I’ve collapsed the tree a little to show the parts) relating to variables, the connection managers, the package itself and the tasks in the package. Clearly, we would not want every single one of these (and sub-properties) to all be configurable via the XML configuration file – the file would be huge. The wizard allows us to specify just the things we need to be configurable, and revert to default (or hard-coding) for the rest. So for example, in my project I’m sure the database will always be the same on all environments – the only change will be the server. So I drill down into the tree in Connection Managers, AdventureWorks, and enable configuration for the ServerName property.
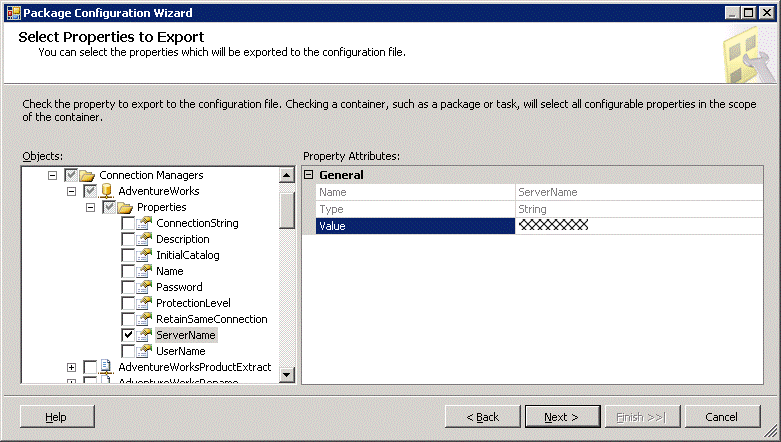
We would also want to be able to modify the OutputFolder variable so we can change the location to which the file is saved.
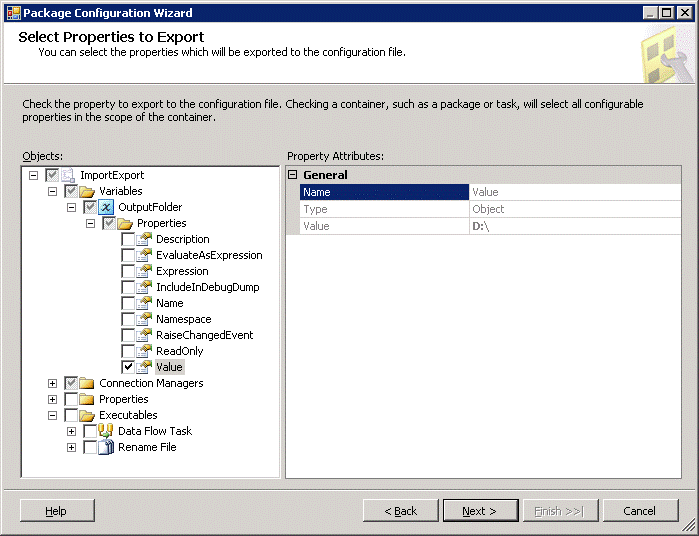
Click Next, give the configuration a name, say XMLConfiguration and click Finish.
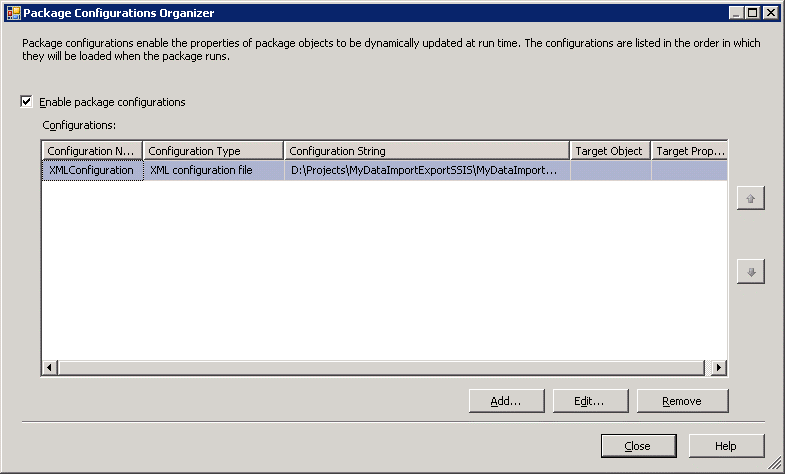
Click Close. Now when you build the package, Visual Studio/BIDS produces an XML .dtsconfig file and a manifest file which is then used to execute the deployment wizard, much as before. The difference now is that when the package runs it first loads the configured values from the XML file.

Now you can deploy the same binary SSIS package to different environments, and simply amend the xml file to change the behaviour of the package as it goes through integration, staging and production modes. Job done! Maybe. If you have a simple package (which will never get more complex) or your development/deployment system is simple and simplistic. So for most of us…not quite yet. A few days after I thought I had finished with the SSIS package a colleague tried to open the project after doing a 'get latest' from the Team Foundation Server (TFS). This was problematic on two fronts. Firstly, by default the SSIS configuration file is not added to the project and hence it was not even in source control. That’s easily solved of course. Secondly, it turned out that the path expected by the package is hard coded as an absolute path. So when my colleague opened it after 'getting' the solution from TFS, the configuration file could not be found. Why? Because he was using a different working folder structure to me. Bummer! My team at the time were prolific users of TFS and branching. That meant from developer to developer from one sprint to another working folders were constantly changing. Clearly hard-coded configuration paths were a non-starter. It would mean that every time someone wanted to open a package after a code branching they would have to re-attach all the configuration files - and if they checked this in, the package would be unnecessarily updated. From a team perspective this was not workable. That got me thinking and looking for something better.
Alternatives to XML configuration
SSIS provides a few alternatives which I had discarded out of hand initially because I had taken the obvious 'web dev' option of XML configuration. Amongst the other options is configuration by environment variable and the other is SQL Server configuration. There are broadly two ways to configure an SSIS package: direct configuration and indirect configuration. Using the XML configuration is a direct configuration mechanism: the packages loads the configuration from the XML file at runtime and it expects to find the XML file in a particular location. This will have to be consistent on every environment or server to which this SSIS package is deployed. So if the package expects the XML file in D:\SSIS\Configuration\XML, it needs to be in precisely that folder structure on every environment to which the package is deployed. What if we use the SQL Server configuration option? Once again we are using a direct configuration: the package will load the configuration values from a pre-defined SQL location which will have to be available no matter where the SSIS package is deployed. This offers a slightly better flexibility to XML configuration because the package can be run from any location provided that it can connect to the database server that holds the configuration data. I won’t repeat all of the configuration steps from above, but essentially, the only difference will be in the first step. When the wizard starts, we choose SQL Server
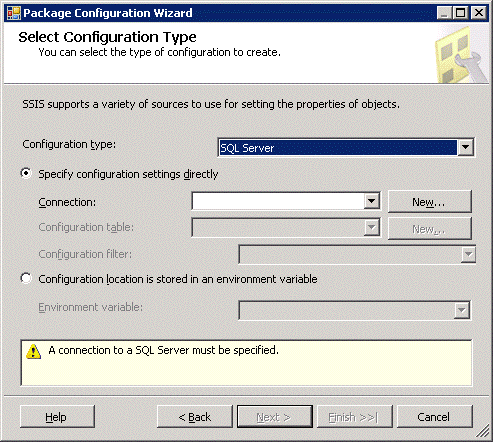
We set up a new SQL connection when we click New… (which is added to the project’s Connection Managers). We can then specify a name for a configuration table, and click New… to create it.
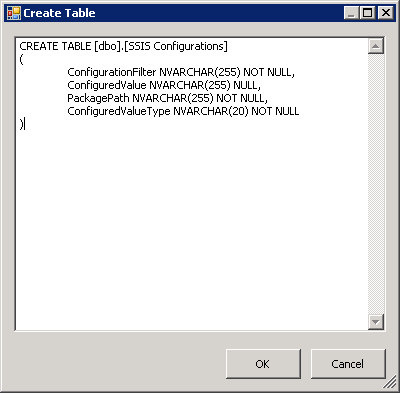
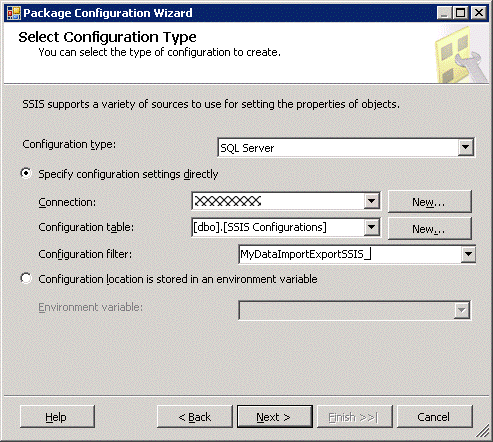
We can (should) specify a filter such as a prefix to distinguish this package’s configuration items from those of other packages. All the other steps are identical. After saving the configuration name, we return to the configuration enabler screen. 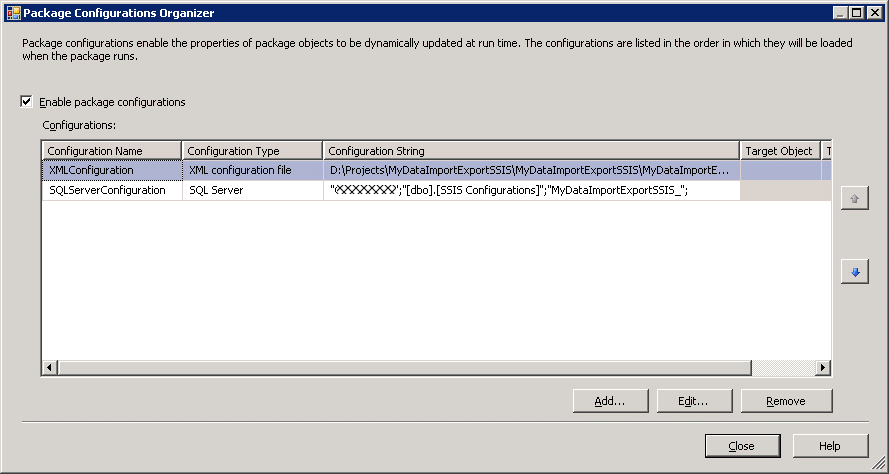
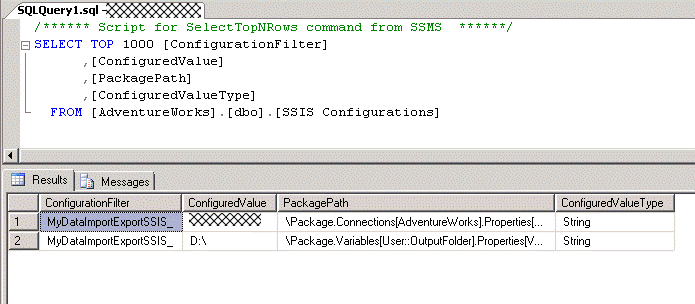
Now when we build the project we get the XML configuration file in the bin\Deployment folder as before, but we also get the new table [SSIS Configurations] with the configuration data.
What about deployments? Right click on the manifest file in the Deployment folder (under bin) and select Deploy. This starts the deployment wizard. I’ve demonstrated how to do the deployment in a previous article of this series so I won’t go into that again here. A key difference now however is the presence of configurability. Part of the way through the installation a Configure Packages window appears.
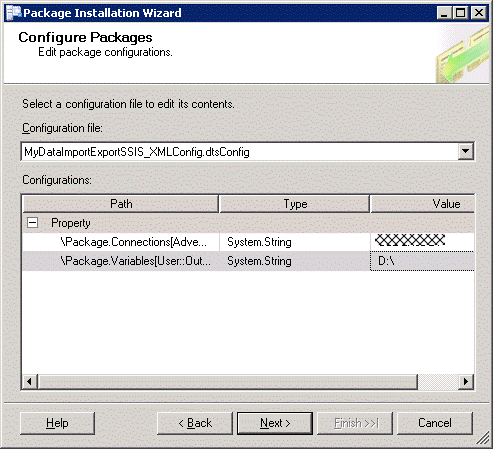
We can directly edit the values here for the deployment environment. In this step the XML configuration is being modified. We can also manually edit the XML later should we wish to change the values. Note that we are not able at this point to alter the values in the SQL Server configuration. To alter the configuration by SQL Server, we have to use SQL DML statements. Let’s try to run this package:
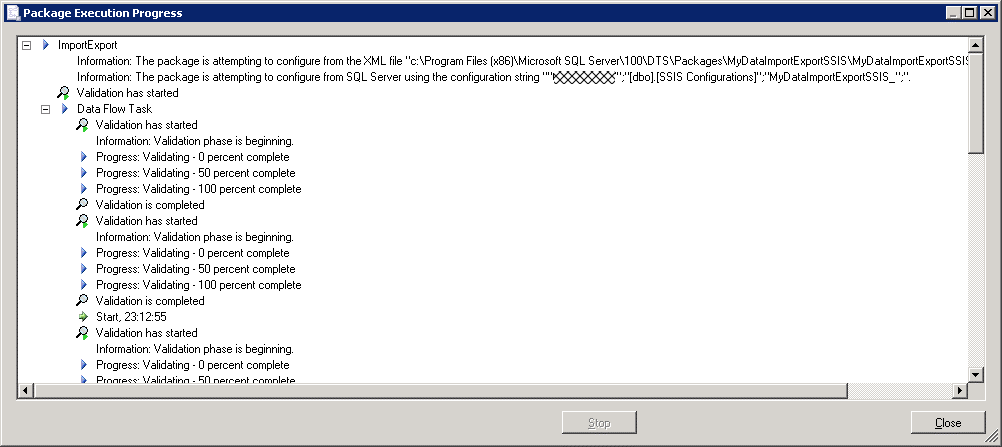
The run window shows that the configuration file is being loaded twice – first from the XML file and then from the SQL Server configuration table. This illustrates a great feature of SSIS: the configuration can be split between different types of configuration and the configuration can be aggregated at runtime. In this case two configurations would be a liability of course, because any values specified in the XML would be overwritten by the values read from the SSIS Configurations table (you can set the order of precedence of different configurations in the Package Configuration Organizer window of the configuration wizard). From the development point of view, the SQL Server configuration would be adequate – even if an SSIS solution got branched or loaded into a different folder structure on a developer’s computer, the configuration data would be separate to the package. But what happens when the package needs to move on to integration testing, UAT and so on? Regardless of where we deploy our package we will loading the same configuration. How then do we differentiate between the different configuration sets required for each environment? We’ll come back to this after discussing environment variable configuration. As an aside, how does the package determine which configuration records in the configuration table pertain to it? The answer is the ConfigurationFilter column which of course matches the configuration name in the Package Configuration Wizard. I thought that the match the package looks for would be a rigid case-sensitive string match. Not necessarily – I’m not 100% sure of this, but it appears that actually the match is done as a LIKE operator: if the configuration name on a package is LIKE the ConfigurationFilter record it is matched – potentially allowing a package to load configuration values of other packages.
Environment Variable configuration
This mechanism utilises environment variables on the Windows Server operating system to save configuration values. The first thing to understand about environment variables is that each variable can store just one value; you can’t save all the variables pertaining to a package under a single variable. This means that for complex packages with any significant number of configurable values, or for environments that will host many packages, the number of environment variables would quickly grow. The variable names must be unique across an environment. If the variable names ‘clash’ packages could stop working or perhaps leak configuration data between each other. For argument’s sake say we wanted to use environment variables for our package. The first thing we have to do is create the variables for the configuration utility to ‘seed’. We can do this using the Windows UI, or use the command line – which is my recommendation. Having a CMD or batch script to create the variables means that it can be quickly executed on any environment that needs to host the SSIS package, and more importantly it can be saved in source control. The following is a sample script that must be executed in an elevated command prompt. The variables will take effect in any command prompt window created after the creation of the variables. That is, they will not be effective in the console window in which they are created. Setx.exe SSIS_OUTPUTFOLDER D:\ /M Setx.exe SSIS_SERVERNAME myserver /M For further information about the setx command, open a command window and type “setx /?”. You will need to restart BIDS to get it to ‘see’ the new variables. The following shows the Configuration Wizard being used to find the new environment variable. You may also need to restart the SQL Server services for SQL Server to pick up the new environment variables. Restart of BIDS and SQL Server may also be needed if the values of existing environment variables are changed.
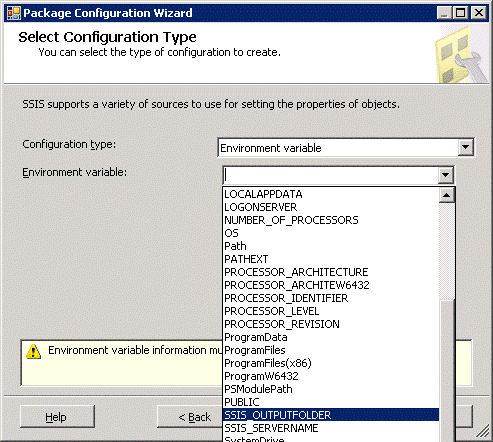
Click Next to choose the property that will be ‘fed’ by the environment variable.
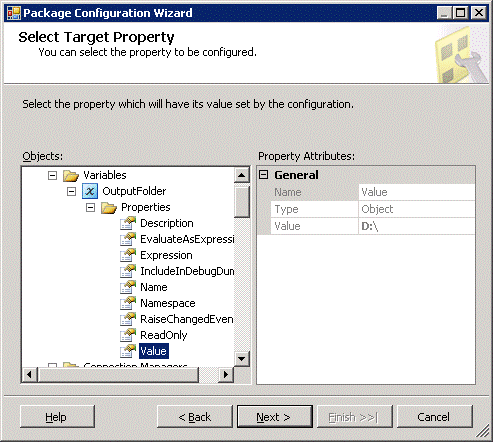
Using environment variables in this way is also a direct configuration – the package seeks configuration from the OS’s environment variables. As you can see ‘pure’ environment variables configuration would not be a serious contender for most SSIS package configurations in the real world. The solution to all these issues is the indirect configuration option. With this approach we don’t provide the values to the package directly. Instead we provide a mechanism which the package can use to “find” the configurable values. For the remainder of this article we will do this using a combination of environmental configuration and SQL Server configuration. How does this help? Well the first thing is that it decouples the package from its configuration. The thing that links the package binary to its configuration is a connection string stored in an environment variable. We can prepare every environment with an appropriate value for the same environment variable. so for example the UAT server would have a connection string to the UAT database. When the package is deployed to UAT all we have to do is set up the values we need (remember the default – probably development values – will automatically be created in the UAT database automatically). At package execution time, SSIS looks up the environment variables and uses them to locate the UAT configuration values.
Indirect Configuration
So with all that we have discussed up to now, how can we set up and use indirect configuration for our package? For a start, I’ll going to delete my existing configuration settings. This means I’m starting on a clean configuration slate. 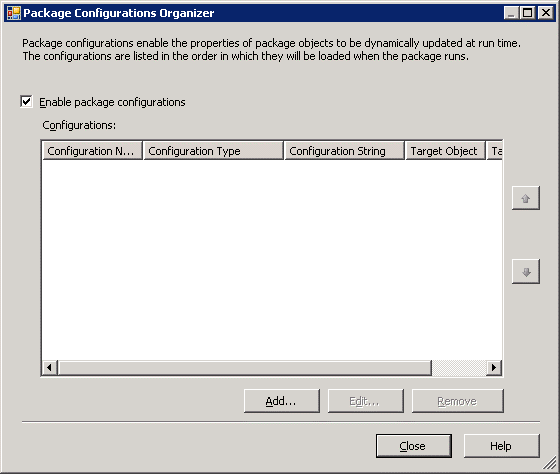
I’m also going to delete all the existing configuration records in my configuration table. DELETE FROM dbo.[SSIS Configurations] WHERE ConfigurationFilter =’MyDataImportExportSSIS_’ The thing to remember is that indirect configuration needs to be done in two steps: first set up the configuration as though it were direct. Then remove that configuration and replace with the indirect configuration. So for the first stage we simply repeat what we did for the SQL Server direct configuration. 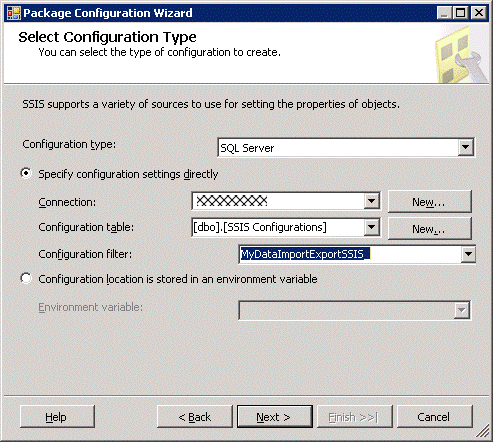
Complete the wizard and build. Deploy the package (using the manifest file from the Deployment subfolder of the bin folder). This creates the SSIS Configurations table (if it does not already exist) and populates the table with the default (probably development) values. Check the database server to ensure this is the case. Now, the next thing is to create a command or batch file to easily set up the environments. Note how the environment variables are named – every effort must be made to ensure that they are, and remain unique to a server. REM Set up the env var to hold the SQL configuration database connection string. This needs to point to the configuration data we just created. Setx.exe SSIS_IMPORTEXPORT_SQLCONFIG_CONN “Data Source=MyDevDbServer;Initial Catalog=AdventureWorks;Provider=SQLNCLI10.1;Integrated Security=SSPI;Auto Translate=False;” /M We need to copy this file for as many environments we need to work with. We’ll need to modify the connection string to different servers and/or databases. Now restart the Package Configuration Wizard and clear the existing configuration. Create a new configuration and choose the Configuration type SQL Server, but this time select the 'Configuration location stored in an environment variable' radio button.
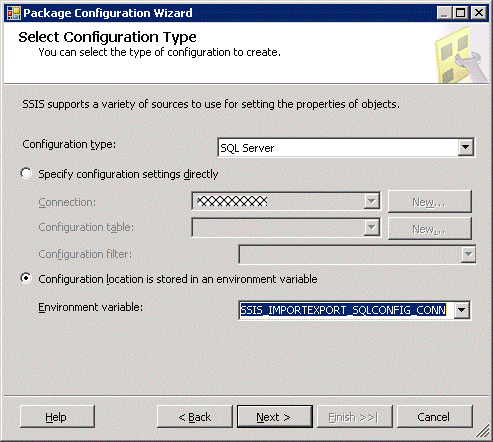
Click Next and enter a configuration name. NB This name MUST be the same as the configuration filter you chose in the SQL Server configuration step.
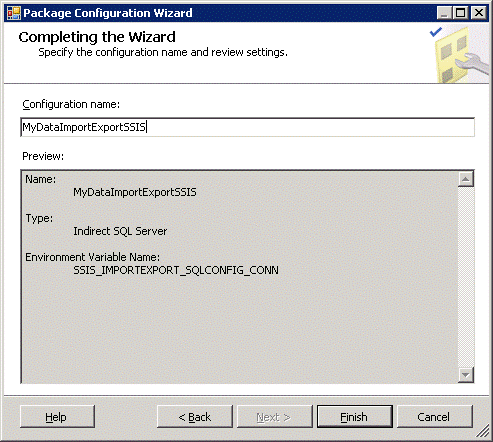
Click Finish. Then click Close to close the wizard. Build the solution. Now deploy the package. It should overwrite the one you just deployed a few minutes ago. Deploy to SQL Server and validate the package after installation. (See Part 1 of this series for more information about how to deploy.) Don’t worry if the validation appears to not pick up the configuration data. That’s it. Now when you execute the package from the SQL server or through an SQL agent job the package will read the environment variable hardcoded into the package and use the connection string it finds there to load its configuration data. When you move the package to a different environment, simply set the same environment variable on that server to point to a different database server so that it loads the appropriate configuration values.
As a final note, I should add that although I’ve used SQL Server for indirect configuration, you can also use XML configuration. Instead of saving a connection string in the environment variable, simply set the value to a file path on a folder or share from which the package can read the XML configuration.