Create a Windows Form Wizard
A few weeks ago I found myself needing to create a Windows Form application that would allow the user to enter details for an operation over several steps and then commit the operation in the final step. Essentially, I wanted to create a 'wizard'.
I didn't want to creat a huge complicated form and thought that like ASP.NET, creating a wizard would be as trivial as dragging and dropping a wizard control onto my form or creating a 'wizard application' from a template. I was instantly disappointed: there is no such thing as a 'wizard application template' or wizard control in Windows Forms development! You can download the complete Visual Studio 2008 solution here!
Create the business object(s)
To kick things off, create the business logic. This will be the object or objects that is going to be 'consumed' by the wizard. To illustrate I'll create a class called Something that will gather parameters from each of the steps of the wizard in order to carry out an operation called DoSomething() which writes to a text file.
- Create a new solution and a class library project called Business. Call the solution WindowsWizard.
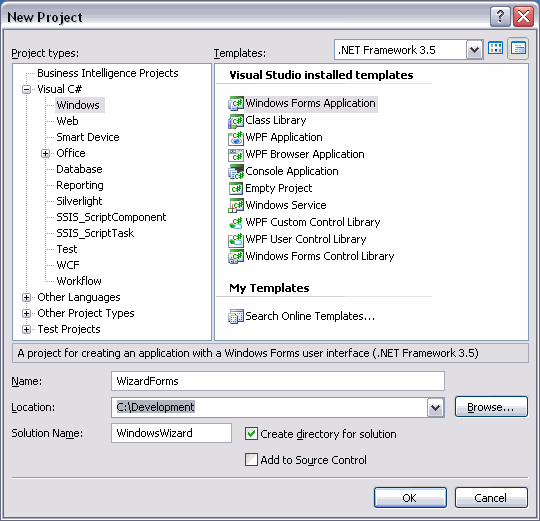
- Rename the default class created to Something.cs
- The gist of the class is shown here:
public class Something
{
    public string Sentence;
    public int Iterations;
    public string Filename;
    public void DoSomething()
    {
        if (!String.IsNullOrEmpty(Sentence) && !String.IsNullOrEmpty(Filename))
        {
            if (Iterations == 0)
                Iterations = 1;
        }
        TextWriter tw = new StreamWriter(Filename);
        for (int i = 0; i < Iterations; i++)
            tw.WriteLine(Sentence);
        tw.Close();
    }
}
Create a master form
If you are a web developer you are probably familiar with the idea of master pages. These are web forms with common controls and elements and definitions for editable regions. Developers can use the master to create content pages that only specify the content. The pages will inherit all the common controls and elements from the master page and display a unified page at runtime. Master pages allow web developers to easily ensure that a common look and feel applies over all pages in a website. There is no such thing as a master Windows form - but that is more or less what we'll be creating here.
- Add a Windows Forms project called WizardForms in the WindowsWizard solution.
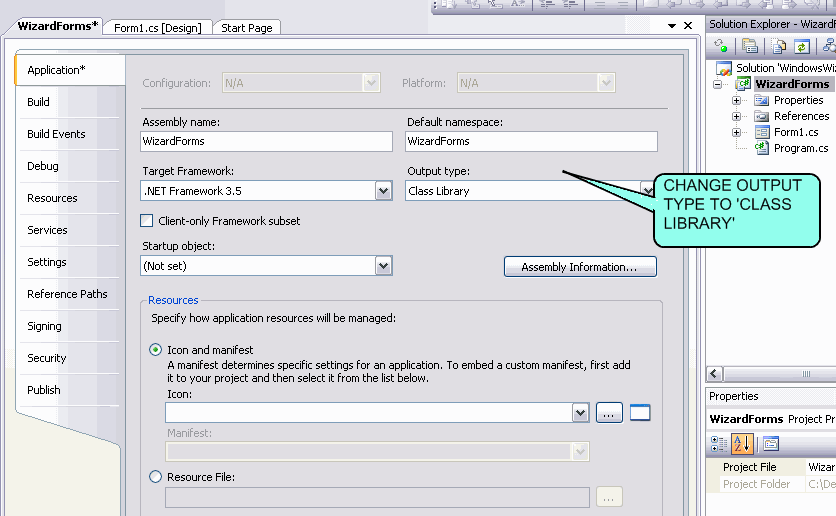
- This bit is critical: right click on the project after is is created and in the Properties, change the Output Type from Windows Application to Class.
- Delete the default form that was created when the project was created.
- Delete the Program.cs file
- This bit is optional: create a folder called Masters.
- If you created the Masters subfolder, add a new Windows Form inside the folder calling it WizardMaster. Otherwise just create the WizardMaster form in the root of the project.
- Switch to the design view of WizardMaster and design the form, ensuring that the design leaves enough space on the form for 'editable regions'. In my form I've added a title, a panel around the editable region and some navigational buttons.
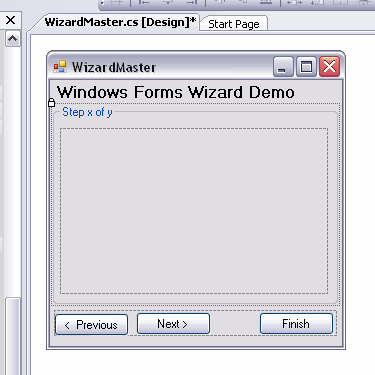
- Use the properties of each of the elements to ensure the control is 'Locked' - this stops the control from being moved or resized.

- You now have to expose the buttons in the code view as public properties. Whilst you could make the buttons 'public', I think this is not a good idea. Having the buttons or any other elements as 'private' will stop you from accidentally moving and changing the button properties when designing the step forms, but the public accessors will allow you to access them programmatically. For example, the 'Previous' button:
        public Button PreviousButton
        {
            get
            {
                return btnPrevious;
            }
        }
- The panel around the content area is also set to 'protected'. You cannot 'lock' the panel because that will prevent you from adding controls into it when you are designing the step forms.
Create the wizard steps
After you have created the basic structure of WizardMaster, you can move onto creating the actual wizard steps. Don't worry if your WizardMaster is not completely perfect. You can go back and change it at any time - and those changes will carry through to your wizard steps.
- In the root of the WizardForms project create as many forms as you need steps in your wizard. Name them Step1, Step2 etc. For this example, I've created 3 steps.
- In the code view of each of the step forms ensure that the forms derive from WizardMaster.
public partial class StepOne : WizardMaster
    {
                 ...........
- Now if you switch to the design view you should see the master form with all the controls you created. They'll each have a little glyph on them showing that they are inherited controls and cannot be modified in the designer.

- You can now design each step form as you would any other form - but only within the defined editable panel.

- In the code view of each step form create public properties of all the values you wish to expose from each step. Alternatively you can just make the controls public by using the modifier property. For example, the txtFileName control Text property is exposed in StepOne:
        public string FilenameText
        {
            get
            {
                return txtFileName.Text;
            }
            set
            {
                txtFileName.Text = value;
            }
        }
Create a wizard controller
You will have noticed that although we have been adding controls to each of the forms we have not been adding event handlers or any logic. This is because the wizard (and therefore each wizard step) is controlled through a controller class and we don't want any logic embedded in the forms themselves.
- Add a new Windows Forms project called Wizard to the WindowsWizard solution and delete the default form. Do not delete Program.cs, we'll need it later
- Add a class to the project called WizardController.
- In WizardController, declare a delegate and event that will report the wizard status, and define an event arguments class that will inform the application of the status of the wizard.
    #region Enum of wizard status
    public enum Status
    {
        Started,
        Running,
        Aborted,
        Finished
    }
    #endregion

    #region WizardStatusArgs class for event management
    public class WizardStatusArgs : EventArgs
    {
        int _currentStep;
        Status _wizardStatus;
        public Status WizardStatus
        {
            get
            {
                return _wizardStatus;
            }
            set
            {
                _wizardStatus = value;
            }
        }
        public int CurrentStep
        {
            get
            {
                return _currentStep;
            }
            set
            {
                _currentStep = value;
            }
        }
        public WizardStatusArgs(Status _status, int _step)
        {
            _currentStep = _step;
            _wizardStatus = _status;
        }
    }
    #endregion

    public delegate void WizardDelegate(object sender, WizardStatusArgs wsa);

    public class WizardController
    {
        public event WizardDelegate WizardEvent;
        .....................
- Add click event handlers on the buttons.
- Withn each event handler access the required properties of each form to get/set the parameters required for the overall wizard operation. For example on the currentStep_NavigateNext handler:>
protected void currentStep_NavigateNext(object sender, EventArgs e)
        {
            if (_stepIndex < _stepForms.Count-1)
            {
                Form currentForm = _stepForms[_stepIndex] as Form;
                Form nextForm = _stepForms[_stepIndex + 1] as Form;
                if (currentForm != null && nextForm != null)
                {
                    currentForm.Hide();
                    nextForm.Show();
                    nextForm.Location = currentForm.Location;
                    _stepIndex++;
                }
            }
        }
Update the Program class
This is the actual program that runs the wizard. Essentially it is a static class that creates an instance of the wizard and runs it - it should in fact already exist, having been created when the project Wizard was created.
- Create a new class Program inside the Wizard project.
- Ensure the class is static.
- Define a static Main method. Inside this, create the WizardController and add the steps required.
- Subscribe the the WizardController event so that you know when to start and end the program.
- Define an event handler for the Status event to run/exit the application depending on the arguments returned.
    static class Program
    {
        ///
        /// The main entry point for the application.
        ///
        [STAThread]
        static void Main()
        {
            Application.EnableVisualStyles();
            Application.SetCompatibleTextRenderingDefault(false);

            WizardController controller = new WizardController();
            controller.AddStep(new StepOne());
            controller.AddStep(new StepTwo());
            controller.AddStep(new StepThree());
            controller.WizardEvent += new WizardDelegate(controller_WizardEvent);
            controller.StartWizard();
            Application.Run();
        }

        static void controller_WizardEvent(object sender, WizardStatusArgs wsa)
        {
            WizardController ctrller = sender as WizardController;
            if (wsa.WizardStatus == Status.Aborted || wsa.WizardStatus == Status.Finished)
                Application.Exit();
        }
    }
Finally, ensure that the startup project in Visual Studio is set to Wizard.
Conclusion
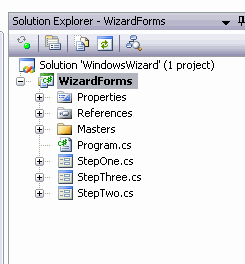
The final structure of the solution is as shown in the image below. 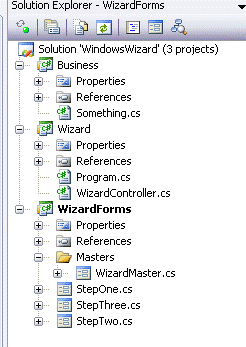
Although I have arranged the steps above in what I think is a logical order, there is nothing to prevent anyone from switching the steps around (obviously you need the WizardMaster before you can create the wizard steps, but other than that you can chop and change). My own technique is to build the very basic bits first and then build the forms, and classes up in fully working iterations. Just for the record, in my research I did find a solution to this that gives one design-time support to create wizards. I guess if you are in the business of creating wizards frequently, this might be worth looking into. I wanted something simpler, self-coded and as it was a one-off, I started with the intention of creating something quite bespoke. As I went on, I realised that this technique could be adapted and used quite easily.