DNS-less Website Relocation
This article was inspired by an idea in a blog entry by Omar Al Zabir. I found when implementing the idea that it needed some fleshing out and clarification, and so I decided to write my own version.
There comes a time when for some reason or another, you will want to move an internet website to another server. It could be move hosting companies or just to move sites from one server to a newer server within your hosting arrangement.
The traditional approach would be set up the site on the new server, duplicating the host headers. Then you would change the DNS entries for you site to point to the new server's IP address. Eventually all users would be served pages from the new server. That is the key word: eventually.
DNS takes time to propagate around the world. For anything between 1 and 4 days someone somewhere may still be using your old server, whilst others will be using the new one. If you log usage or are using separate data sources for each server/website this could cause a headache when you want to reconcile all the visits. It would be far better if you could instantly switch all users over to the new server, and deal with DNS as a separate issue (or almost).
This article will explain how. Since learning of this technique I have used it successfully a number of times and felt it would be useful to share.
1. Create a transfer domain
This is the only part of the operation that takes time - and it's not time on your part. It involves DNS propagation. You must create a domain name to apply to the website on your new server. You can create a sub-domain or a completely new domain, although I guess creating a new domain will have a cost implication. Say you create a subdomain ww2.mysite.com and point it to the IP address of the new server. You will have to wait 3 or 4 days for this domain entry to propagate so do this well in advance of the move.
2. Create the new website
This is done on the new server. Create a copy of the original website on the new server. Apply all the host headers that are active on the current website. So if the original has www.mysite.com, www.mysite.net, mysite.biz, then these should all be applied to the website on the new server. The critical part here is that in addition to the other host headers, you must apply the host header created in step 1.
Make any configuration changes required to the website (e.g. paths in web.config or data sources) and ensure the website runs as expected (but under ww2.mysite.com).
3. Create the redirector application
I've used C# and .NET 2 to create my redirector, but it is not important what is used - simply adapt the steps to your version of .NET and the language you are using.
Create a folder called mysiteredirector and inside it copy a basic web.config, a default.aspx file, and a global.asax. That's it. You could just create this in Notepad or a text editor. You don't need to build the project. The default.aspx file should be empty. Don't worry about a code-behind file. It is not required.
In the global.asax file paste the following code.
<%@ Application Language="C#" %>
Copy this folder up to the CURRENT server.
4. Create the redirector website
Call the redirector website something like MySiteRedirector. The name is not important but will help you to identify the site more easily if you are moving lots of sites from the server. If you want to redirect all traffic hitting this website then the MySiteRedirector must have all the host headers as the the site that you'll be moving. However, if you do this, you'll find that you are not able to start the website in IIS. (If it does start, make sure you stop it before doing anything else! If you don't it will cause problems with the actual site still serving those host headers.)
Set the home directory of the redirector site to the folder you created in step 3.
With the redirector site off, go to the properties. The actual redirecting is handled by the code. However in order to make the redirect apply to sub-folders and query-strings we need to apply an isapi filter to the site to redirect traffic to the new site.
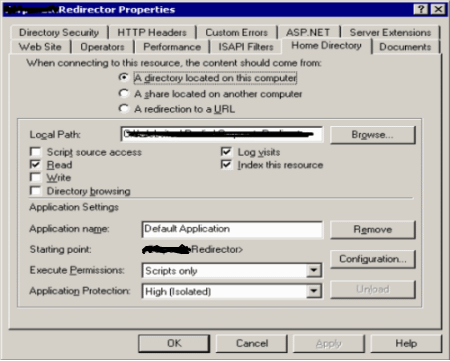
To do this, right click on the website in Internet Services Manager and select the Home Directory tab. Create an application if one does not already exist. Then click on the Configuration button. 
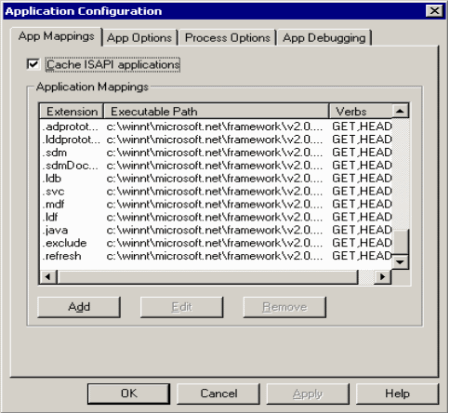
This is done in IIS 5 (Windows 2000) as follows.

Click on Add

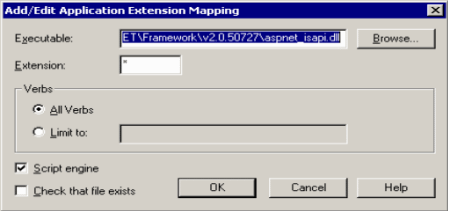
Click on browse and find the ISAPI dll for the .NET version you are running. In the image above it is .NET 2, which is in the Windows/ Microsoft.NET\Framework or Winnt/ Microsoft.NET\Framework folder. NOTE: Please remember to ensure that the redirector does NOT verify that the file being requested actually exists. That means you ensure the checkbox ‘Check that file exists’ is cleared.
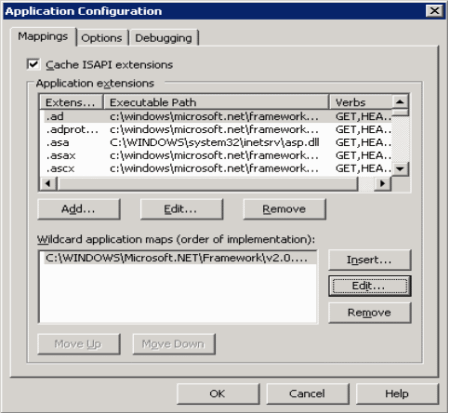
If using IIS 6 (Windows 2003) go to the Application Configuration dialogue

Click Insert and browse to the ISAPI dll for the .NET version being used.

NOTE: Please remember to ensure that the redirector does NOT verify that the file being requested actually exists. That means you ensure the checkbox ‘Verify that file exists’ is cleared.
I also take some trouble to put the redirectors into an isolated or different application pool although this is not necessary.
5. Making the switch
To switch the redirect on we stop the live website. As quickly as possible (remember the site is now 'down') start the redirector. Traffic coming to www.mysite.com now first hits the MySiteRedirector, which then redirects the user to ww2.mysite.com.
If users had bookmarked a specific page inside the site, eg www.mysite.com/folder/folder/page.aspx?id=2323&ext=kasd0890, this too gets redirected to ww2.mysite.com/folder/folder/page.aspx?id=2323&ext=kasd0890.
So we are now using the new server without changing the DNS. In my use of this technique I continued to use the redirect for a few days to ensure the new server and site are stable. The idea is that should I ever lose confidence in the new site, I would be able to revert to the original server simply by stopping the redirector and starting the original site in IIS.
6. Change the DNS entries (finally)
When you are confident of your new setup, then you can change the DNS entries for www.mysite.com, www.mysite.net, mysite.biz. This will take a few days, but your users won't notice any real difference. Users hitting your old server will see their urls change to ww2... and users with updated DNS will instantly see the new server as www....
After a few more days, you can safely stop the redirector on the old server. If you want to you can keep ww2 as a host header on the new server (in case someone has bookmarked on that domain), or you can simply remove it from the host headers collection, leaving just what was on the original site.
Optional extras
- IP restrict your new site until you need to make it publicly accessible. Will stop search engines picking it up and users stumbling upon the new site before it is ready to be used.
- If the original site is liable to change during the process, remember to make a last minute update of the site files before switching over to the new server.